C/C++ and Bitmap Files
by OULD MOHAMEDEN BABA Moctar , homepage: http://babasoft.4t.com
BASIC
C&BITMAP KNOWLEDGES 1
I-General
Presentation :
This
tutorial is for Novice C(or Unix Systems) users. It
shows you how can you create and manipulate your own images with c
programs. There is no special astuteness, it's easy to learn, to
apprehend.
BITMAP
Images : the bitMap images or Raster Images are pixelled images,
that means a collection of points(pixels) contained in a
table,
every point among them has one or many values describing its color.
It's a MaP of bITs (x bits represent one pixel).
Pixel
: PIcture eLement. The pixel represents the tiniest element that
constitute a numeric image. The collection of these pixels is
contained in a 2d table (map) thats constitutes the image.
Let's
see a first example :
1.this
is a bitmap image that contains the letter a
So,
the image has a quality defined by it's definition, it's color ...
So,
below you can have different images quality and the correspondent
Memory Size of the file :
Image
definition
black
and White(1 bit)
256
colors(8 bits)
65000
colors(16 bits)
True
color(24 bits)
320x200
7.8
KO
62.5
KO
125
KO
187.5
KO
640x480
37.5
KO
300
KO
600
KO
900
KO
800x600
58.6
KO
468.7
KO
937.5
KO
1.4
MO
1024x768
96
KO
768
KO
1.5
MO
2.3
MO
This
shows the quantity of the video memory that needs your graphic card
that is function of the screen definition (The number of showed
Points) and of the colors number. The example shows that you must
have at minimum a 4 MO video card memory to be able to show a
1024x768 resolution with true-color...
II-Let's
attack the main subject :
So,
in this second part, i will present the main subject, i.e how can you
write your own images with a very simple c/c++ code??
do
you know how i discovered all this? Very easy!! One night, at roughly
10:00pm, i was working on my favourite O.S Linux Mandrake 10.1 and i
was testing some line commands. Suddenly, i found a program named
bitmap i think, and i launched it, and i saved an image that i
created without any extension. Later, i tried to open it and Kwrite
launched it and i discovered that it was a c code : it was a bit
map!!!
So,
i taked many hours(no, i remember, it was 2 hours roughly) to
understand such encoding : it wasn't difficult, but when you try in
your first time, i can warrant you that it isn't easy.
In
this first part of the TUTORIaL, we will ONLY talk about black and
White images.
Let's
take a first example. So, in first time we will work with a 16x16
bitMap image.
PIXeL
1 PIXeL 2
PIXeL
31
PIXeL 32
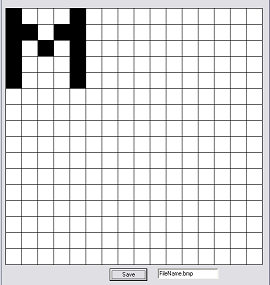
1.this
is a 16x16 bitmap image that contains the letter M
In
this example, we have a 16x16 bitmap image. That means that we have
16x16=2^8 = 256 points. So this image is composite of 32
pixels(each pixel is on 8bits). These pixels are situated, in growing
order, from the top on left to the bottom on right.
each
pixel constitutes 8 points(bits) in bIG-INdIaN order:
0
1 2 3 4 5 6 7
each
case represents one bit value (0 or 1). each value holds different
color(black or White).
1-If
the bit holds 1, that means that the color is bLacK.
2-If
the bit holds 0, that means that the color is WHITe.
So,
we can say(look at the image) that aLL the IMaGe is simply a 32
characters vector that holds the pixels' values.
N.b
: unsigned char <=> 8 bits.
So,
now we can try to ReSUMe all THIS with a very very easy c/c++ code.
Let's
see the previous example representing the Letter M :
#define
fileName_height 16
#define
fileName_width 16
static
unsigned char fileName_bits[ ] = {
0x11,0x00,0x1b,0x00,0x15,0x00,0x11,0x00,0x11,0x00,0x00,0x00,
0x00,0x00,0x00,0x00,0x00,0x00,0x00,0x00,0x00,0x00,0x00,0x00,
0x00,0x00,0x00,0x00,0x00,0x00,0x00,0x00,
}
1.this
is a 16x16 bitmap image code in c/c++ that contains the letter M
Now,
we will explain how we have this values. To write M (as an image :
look at the schema), he will have:
pixel
1 = 1000.1000 =(Inverse to have bIG-INdIaN) 00010001 =
0x11
pixel
3 = 1101.1000 =(Inverse to have bIG-INdIaN) 00011011 =
0x1b
pixel
5 = 1010.1000 =(Inverse to have bIG-INdIaN) 00010101 =
0x15
pixel
7 = 1000.1000 =(Inverse to have bIG-INdIaN) 00010001 =
0x11
pixel
9 = 1000.1000 =(Inverse to have bIG-INdIaN) 00010001 =
0x11
aNd
for each i != 1, 3, 5, 7, 9 pixel i = 0x00
Now,
I'm trying to develop in JaVa, KYLIX or c++ a application that
generate bitmap files that uses this method!!!
So,
don't hesitate to help me by sending me mails ouldm8@yahoo.fr)
or by signing my Guest book on my web site : www.babasoft.4t.com.
Thank for you and the all Linuxfocus Team!!!
You
can also find this tutorial on my web site :
www.babasoft.4t.com/Tutorials/graphics/bitmap_c1.html
bY
OULd MOHaMedeN baba Moctar....
|
![[lf icon]](../images/lflogo.gif)